Kitchen + Living Room Tour with $500 Rejuvenation Giveaway

Kitchen + Living Tour with Rejuvenation | edibleperspective.com

Please note I cleaned before these photos. This is real life for about 13 minutes per week.

We've been in our new house for an entire month now. It's still hard to believe we're finally in, since this has been in the works since last May. We were lucky to find the house when it was only a foundation in the ground, because that meant we were able to pick out all of the interior finishes. A total dream.

Around the same time, I started chatting with the lovely team at Rejuvenation about possible ways we could work together. The timing seemed to work out perfectly as we were planning finishes and looking for some unique items to include in the design. While we're not renovating or DIY-ing much anymore (I take that back, Chris is currently building an outdoor bench), I still thought it would be fun to show you how the space is coming together.

This post + giveaway are sponsored by Rejuvenation

Kitchen + Living Tour with Rejuvenation | edibleperspective.com

I briefly mentioned in the last post that one of the main reasons for moving was career related. While we loved our old house and the improvements we made along the way, the space and flow were no longer working as my projects grew in size and became more frequent. I also knew I was going to have larger collaborations coming up, with multiple people working at the house, and it just wasn't set up in a way that worked well for that. I tossed around the idea of finding studio space, but it's much more involved than looking for a simple office. I need a full kitchen, storage space, enough natural light to shoot in, etc. We figured that if we could find what I needed in a home, it would make more sense than leasing a separate studio space.

Once we figured out that this was going to actually happen, we started trying to plan the overall style for the house (the layout was predetermined). I'm not sure I really have a name for our style. Sort of, soft modern meets simple industrial? I say "soft" modern, because we like to bring warmth to the space with different types of wood furniture and pops of color here and there.

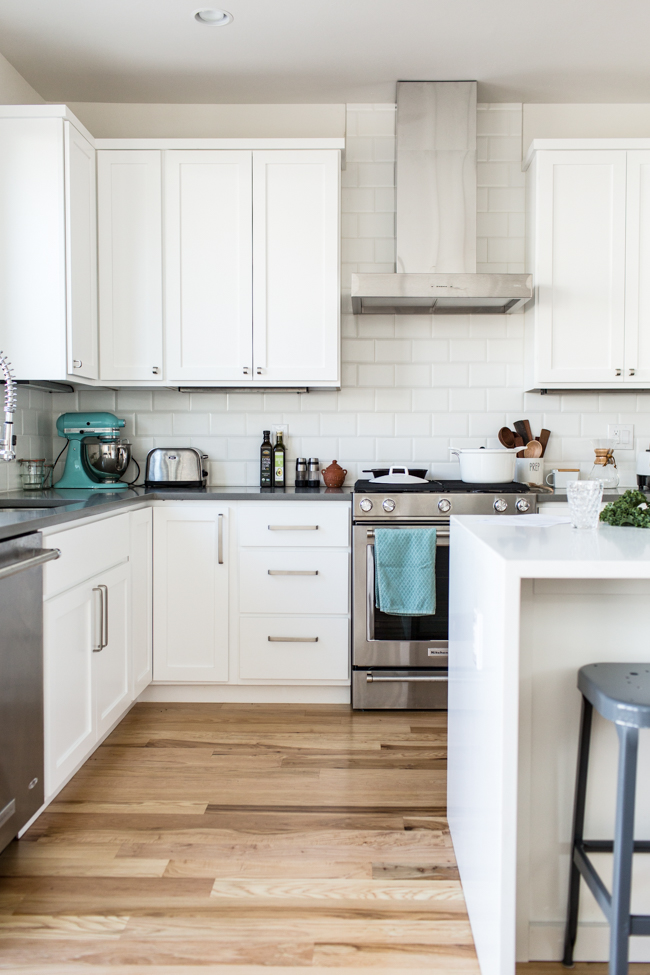
We've always loved clean lines,  and if you've been here for awhile, you know I have an ongoing obsession with white cabinets. This first floor has plenty of room but isn't huge by any means (it's probably hard to gauge in photos), so we wanted to make sure we kept it feeling bright + open. This was achieved with the unstained hickory floors, white cabinets, white counter (on the island), white backsplash, and white paint.

While cabinet and draw pulls are a small detail, they make a big statement in our kitchen, because they're visible from the moment you walk into the house. I was looking for something simple and clean, but again, also with a softer look. I instantly fell in love with basically all of Rejuvenation's options, but landed on their Larkin pulls in brushed nickel. It was the 1-inch finger pull that did me in (photo above). I could not handle how cute they were but also thought the overall style was just what we were looking for. 

(I'm standing in the entry of the house in this photo and the office is directly to my right.)

Kitchen + Living Tour with Rejuvenation | edibleperspective.com

Next up was a ceiling fan for the living room space. This is where we started to incorporate the industrial look. The brushed nickel color makes the fan blend in with the space, rather than something like black that would have really made it stand out. It's still a sort of statement piece but doesn't overpower the room. This was important to us with how open everything is.

Perefrine Industrial LED Ceiling Fan

Kitchen + Living Tour with Rejuvenation | edibleperspective.com

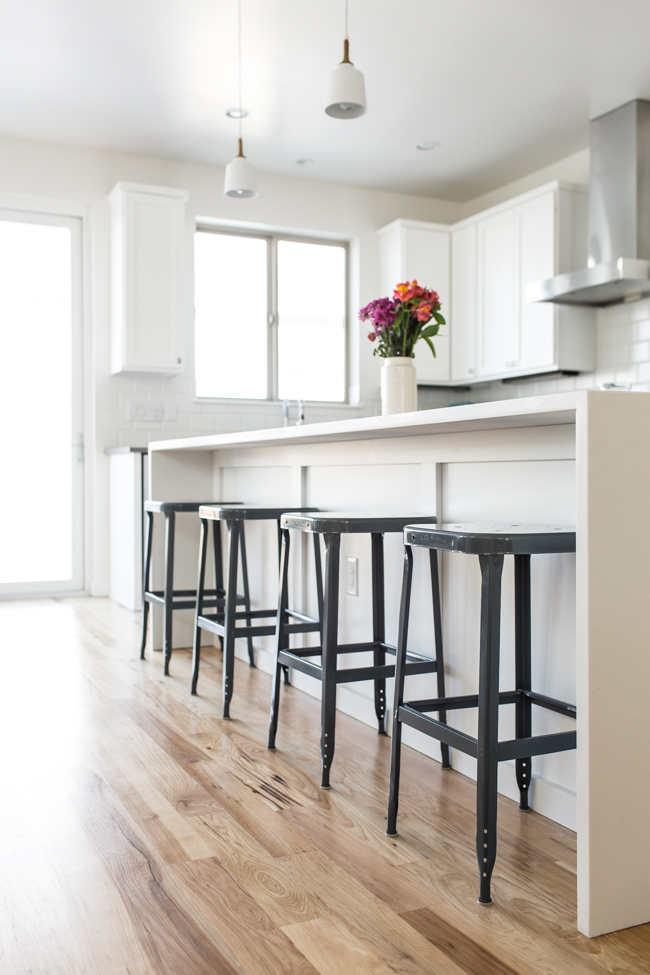
Back to the kitchen to check out these simple Aurora Industrial Stools. We wanted stools with a low profile, so they wouldn't overwhelm the space. We also wanted them to be light enough to easily move around the room but at the same time, sturdy. We thought throwing in another type of wood might be too intense, so that was quickly nixed. These had just the right amount of industrial flair and complemented the gray counter that wraps the back kitchen wall.

Kitchen + Living Tour with Rejuvenation | edibleperspective.com

I'm not sure if I'll be keeping my photo cart in this main room permanently, but it works for now and is used as storage for some of my photo props. Instead of solely photographing on the cart, I am now able to photograph on our dining room table, the island counter, and the floor by the back doors. It's amazing to have different options in this house!

I will definitely admit taking photos in this space has had a huge learning curve, and I'm still getting the hang of it. There are way more windows than I've had in the past and they're south + west facing (more intense sun), so I'm really having to learn how to control the light. But I've been having a lot of fun trying to figure it all out.

Kitchen + Living Tour with Rejuvenation | edibleperspective.com

To break up all of the white in the kitchen, we decided on gray counters to wrap the back wall. It added just the right amount of color and warmth to the space.

Kitchen + Living Tour with Rejuvenation | edibleperspective.com

Dakota was also an integral part of the design process. 

(Her bed is an inexpensive memory foam bath mat and both dogs love them!)

Kitchen + Living Tour with Rejuvenation | edibleperspective.com

One of my very favorite aspects of Rejuvenation's website is the how customizable everything is. Especially in their lighting department, there are more options than you could ever imagine, and you can preview every single combination they have. It's pretty dang fantastic. 

We definitely tried incorporating a bit of the industrial feel with our fixtures throughout the house. I'm pretty sure I spent hours going through options on Rejuvenation's site. Just for this Eastmoreland Semi-Flush light, you have 10 choices for the finish and 53 shade options! I decided on the brushed nickel finish and clear glass shade (14 inches) to keep things simple and clean.

(Living room is directly behind me in this photo.)

home office photos | edibleperspective.com

My office is a work in progress but it's already such a bright, happy space to work in. Maybe one day I'll go through all of those papers under my desk...

And that adorable little light at the edge of my desk? You can find that in 3 different wood options on their site, too!

home office photos | edibleperspective.com

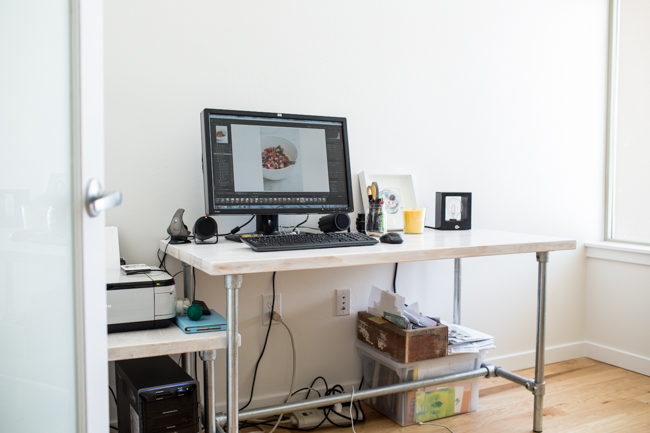
Behind my desk is this temporary bookshelf. We've had this metal shelf for about 10 years now (used to hold a million different things), and I'm pretty sure we're keeping it for life. (The Legos were for a recent photo project.)

Kitchen + Living Tour with Rejuvenation | edibleperspective.com

And now, the part you probably scrolled to immediately when you saw all of that text I just spewed out. Oops.

Giveaway!! Rejuvenation has offered 1 lucky Edible Perspective reader a $500 shopping spree to spend at their store. Check out all the ways to enter below!

Ashley

This post + giveaway are sponsored by Rejuvenation. All opinions are always my own. I only partner with brands I love and think are a fabulous fit for this blog. Thanks for your continued support!! Rejuvenation supplied the items shared in this post.

Home Renovations: Master Bath

Okay.

I think I’m finally ready to start posting about some of the renovations we’ve taken on at our new—but old—house.  I’ve always enjoyed sharing our house projects since buying our first house not too long ago, so I thought I would continue with house #2.  We are still in a bit of shock that we bought our first home only 2 1/2 years ago, gutted it, renovated it, sold it, moved back to Denver, bought another house, and are now renovating once again.

Living and working in a house with renovations happening 7 days/week is…intense.  We are so glad to be through the craziness you see below.

Fortunately, we were able to hire a team to tackle the basement + kitchen construction.  We were on a tight budget but by acting as our own general contractor and getting numerous quotes for each project we were able to save a sizable amount of money in the process.  We also decided to take on some of the smaller jobs ourselves.

If you’ve ever begged for time to slow down just start a huge project like this while you’re living in your house.  Time will never go by so slowly.

BUT!

It will eventually be over and you will slowly forget the crazy days. 

Now!  Let’s talk about the bathroom.

Home Renovations: Master Bathroom | edibleperspective.com

In the photo above I’m standing in our future master bedroom looking into the future bathroom.  Part of the basement was “finished” but about 1/2 of it was unfinished space with the laundry area, furnace, water heater, etc.

In the photo below I’m standing in the exact same spot but with no mess and the bathroom framing finished.  We definitely had some major constraints to work with when planning this bathroom. 

  • low-ish ceilings – they’re just over standard door height ~7-feet
  • ductwork + plumbing that couldn’t be moved without spending a fortune which caused ceiling soffits – you can see some of it framed out on the ceiling in the below photo that was later turned into a soffit…there is also a large soffit in the bathroom from upstairs plumbing
  • furnace in an inconvenient location causing a long + narrow bathroom layout – again, this would have cost too much to move so we worked around it as best as possible
  • 2 windows in the area we designated for the bathroom – sounds good, but it was hard to plan around and we weren’t sure how it would work with hanging bathroom mirrors...however, the windows definitely worked out in the end
  • sloped floor – the concrete foundation is sloped noticeably higher [by a few inches] to the exterior walls of the house – this caused the shower + tile floor to have a slightly harder installation…we could have poured a level floor, but again, way too much money
  • wanting to keep as much unfinished space as possible – this is a fairly small older home with not a ton of storage space, so we wanted to keep as much unfinished storage space as we could

Big thanks to my awesome friend Sarah who is an interior designer.  She helped us draw up + brainstorm a handful of ideas to work with for the bathroom layout.  Between the narrow space, plumbing, windows, ductwork, and furnace it was quite the challenge to piece together!

Home Renovations: Master Bathroom | edibleperspective.com

Above, you’ll notice we installed a pocket door to avoid the space a door takes up when it swings open + close.  The bedroom is a nice size but the door would have swung into the bed when opening it.  This pocket door was the only new door we bought for our renovation.  We were able to reuse all of the old doors for our new doorways that we added [4 total] saving hundreds of dollars [in materials and extra work].

photo 3(1) Home Renovations: Master Bathroom | edibleperspective.com

Above I’m standing in the doorway looking at the vanity area.  And above to the right is the vanity area with drywall.  You can see the soffit on the ceiling due to the plumbing from the upstairs bathroom.  Luckily, it’s high enough that we don’t have to duck in the bathroom.

We had the plumbing installed but did everything else ourselves in the vanity area.  We decided to go with a floating butcher block vanity and no cabinet below.  Although, we may add a freestanding cabinet or shelving at some point.  We wanted the space to feel very open with a minimalist feel.  Clean lines, cool colors, simple fixtures.

Home Renovations: Master Bathroom | edibleperspective.com

In the next phase I painted the bathroom two slightly different shades of a gray/blue [which you can’t tell here].  I also found a steal of a deal on mirrors at Lowes one random day.  Most other items were bought on Amazon or at Ikea.

Home Renovations: Master Bathroom | edibleperspective.com

We did hire someone to tile the floor and shower because the jobs were a bit more complicated with the sloped floor and poured concrete shower.  However, we scored an amazing deal on the tile work!

I did do the vanity tiling, though!  Look familiar

The tiling took about 4 hours, the grouting another 2-3 hours, and the caulking about 1-2 hours, which I spread out between a few days.

Home Renovations: Master Bathroom | edibleperspective.com

I looked to Pinterest for some design inspiration but have always had this bright white and soft blue bathroom with clean lines in my head.  I wanted it to feel natural and spa-like. 

You can definitely see what I pulled from each photo, except the shelves, but hopefully those will come in the “finishing touch” phase.

Home Renovations: Master Bathroom | edibleperspective.com

While we still have a few final touches to add the bathroom is fully functional and ready to share!

Home Renovations: Master Bathroom | edibleperspective.com

Above, I am standing in the doorway.  The white door to the right is our closet.  The space just beyond the vanity is where the toilet is.

Below you’ll see half of the vanity area.  While the two windows [one in the shower] were hard to work around for the layout they ended up being such a refreshing and inviting part of the bathroom design.  I still can’t believe how bright our basement bathroom is during daylight hours.

Home Renovations: Master Bathroom | edibleperspective.com

We were hesitant about what it would look like and how we were going to hang mirrors with the location of the window.  At some point I stumbled on the lower left photo on my inspiration board and knew the answer would be to lean the mirrors on shelves.

I absolutely love how this turned out.  Eventually, we want to add a few plants on the window sill and have them hang down around the mirror a bit.  For now, we use the shelf to hold daily bathroom products we use.

We’ll also be adding a light above the left mirror since it’s a bit darker than the right side.  Also, when it’s dark out and the bathroom light is on the soffit above the left mirror [you can barely see it in the photo below] blocks the ceiling light at a harsh angle, which the mirror light will help with. 

Home Renovations: Master Bathroom | edibleperspective.com

I’ve always thought it would be cool to have a private nook for the toilet.  We didn’t have room for an actual “toilet closet” but I’m glad we had room to tuck the toilet in this semi-private space.  To the left is a small linen/toiletry closet that we still need to install doors and shelves in.

We bought a dual-flush toilet from Lowes [and got a water savings rebate!] that we are loving!

Home Renovations: Master Bathroom | edibleperspective.com

We went with a funky towel rod from Ikea to hold our bath towels.  There are four arms that can move 180* so you can easily hang two towels and then pivot them in opposite directions so they dry well.  We preferred this over hanging a low and high towel rod on the wall.

Home Renovations: Master Bathroom | edibleperspective.com

The shower is door-less as you can see.  You just walk right in and turn to your left!  However, if we ever decide to, it would be totally doable to add a swinging glass door.

We lucked out being able to get this window lined up perfectly in the shower area and also have a nice window ledge for our shower products.  However, because of the window placement we couldn’t install a standard wall mounted shower head.  So, we had a ceiling-mounted rain shower head installed instead, along with a hand sprayer [for cleaning the shower and washing the dogs] that we still need to mount to the wall.  We could have installed a shower head where the hand sprayer is but the space is a little tight when you face that wall [kind of hard to explain without standing in the shower]. 

I searched for the absolute best deals on all of these pieces and so far we’re really pleased with everything.

The subway tile is from Home Depot and is the cheapest tile you can find.  It’s $.22/tile!  We did splurge for the shower floor but since it’s a small space it didn’t break the bank.  The floor tile was $10/sf.

Home Renovations: Master Bathroom | edibleperspective.com

Below is our repurposed closet door that still needs some love.  Our closet was one of the biggest issues in the planning.  There just wasn’t an ideal location for it at all.

Home Renovations: Master Bathroom | edibleperspective.com

It ended up about 4 feet wide by 5 feet deep with deep ceiling soffits, 2 partially slanted walls, and a column as you can see below.  Right now it’s our shoe closet but soon it will be stuffed with clothing.  We’re still trying to figure out how best to layout rods + shelves in here.

Soffit – An interior soffit is a drop-down part of the ceiling, typically framed in wood, that can be used to hide plumbing [from above] or ductwork.  However, it can also be used as a design feature. You could build a soffit and install lights in it for a dramatic look, or add one to define a space in a certain room. A lot of times they're used in kitchens and come down about a foot from the ceiling and then cabinets are attached below them. There were a few spots where we had ductwork and plumbing that couldn't be rerouted, so the only way to cover them was to build a soffit around them.

Home Renovations: Master Bathroom | edibleperspective.com

Home Renovations: Master Bathroom | edibleperspective.com

The hand towel rods had to be installed under the sink for 2 reasons.  1 – In the photo below the wall you see on the left is where the pocket door slides into, so nothing can be mounted on that wall.  2 – On the other side of the wall there was a poorly positioned light switch and outlet that would have been in the way of the rod.

So, under the counters they went and the placement is great!

Home Renovations: Master Bathroom | edibleperspective.com

Home Renovations: Master Bathroom | edibleperspective.com

Check out that fancy angled tile work.  My tile skills are improving!

Home Renovations: Master Bathroom | edibleperspective.com

To hold the extremely heavy piece of butcher block in place we installed 2 large brackets in both corners on the back wall.  We also had a third in the center but this still made for a semi-unstable counter.  If you put your weight on the counter you could definitely feel it move.

Ikea to the rescue!  We bought 2 adjustable table legs and screwed them in at the front corners.  We ended up liking how this looked and it provided full stabilization, allowing us to take the center bracket out.  You can put your full weight on the counter now without it budging.

Home Renovations: Master Bathroom | edibleperspective.com

cost breakdown + links:

I think some of the best deals were the sinks, faucets, mirrors, bathroom floor tile, shower wall tile, and the rain shower head.  But really, there weren't any off the wall expensive items.  We spent hours searching reviews and finding deals and are ecstatic with how things turned out.  Creating an entire bathroom from scratch can add up quickly, but I think we did the best possible job balancing our vision + our budget.

And now ends the longest post ever.

Ashley