
coconut tres leches pancakes + CAKE
/Where oh where to start with this post??
Are you intrigued by the title? Specifically with the word, “cake?” You thought you were just getting pancakes today but little did you know this is a double recipe post.
But you will soon learn there is really only 1 recipe with 2 different outcomes. Like a 2 for 1 deal. Only better.

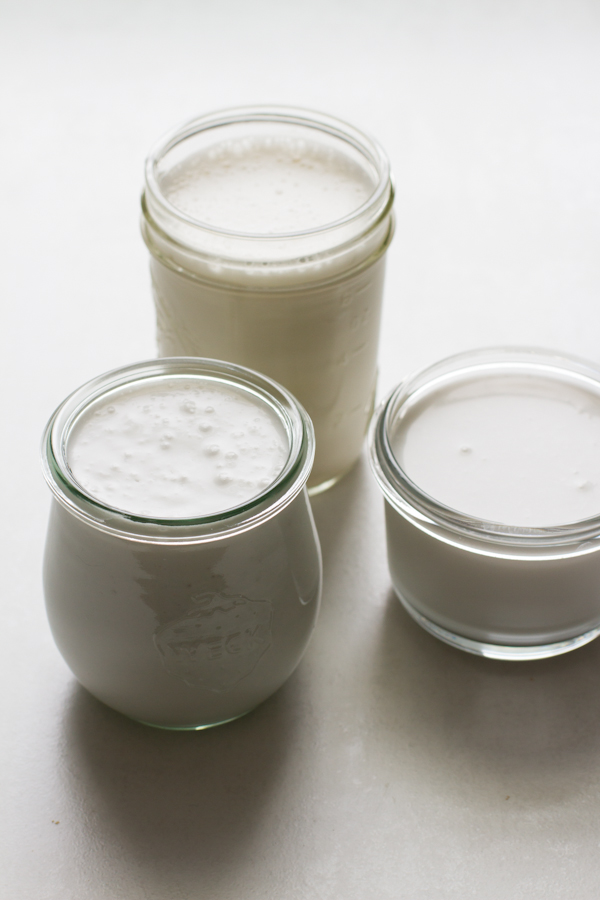
It all starts with the milk, or milk-s to be exact.
THREE milks! Hence the whole “tres” thing. You know…uno, dos, tres… And if you didn’t already get it, “leches” means milk.
Now that we’re all up to speed on “tres leches,” I put a little spin on the milks that are traditionally used.
Alton Brown uses sweetened condensed milk, evaporated milk, and half + half. I’ve also seen heavy cream instead of the half + half.
Instead, I thought coconut would add a nice twist. So, I decided to use 2 types of coconut milk and homemade almond milk.
The three milks are not only smothered over the pancakes but they are also mixed IN the pancake batter, making these the most amazing pancakes I have ever had in my whole entire life.
I kid you not. I wouldn’t joke about such a thing. Especially on a Friday.

If you are not a huge coconut fan, don’t worry. The coconut flavor from coconut milk is very mild. It’s much less intense than coconut oil or flaked coconut. But if you absolutely despise coconut, I have an idea for you which I mention in the recipe notes. Be on the lookout!
So the idea with tres leches cake is that you bake it, poke a bunch of holes into it, and then pour the milks overtop and let them soak in. This worked swimmingly with pancakes as well.
Stack.
Poke.
Drench!

Here’s a little close up of the drench part.

Oh, and again.

And just incase you needed further convincing.

The resulting pancake is perfectly tender + fluffy with a golden brown exterior.

Gluten-free or not, you need these in your life. This weekend and forever. The milk topping is the most incredible addition to pancakes. It’s lightly sweetened with maple syrup which means you can dredge the entire stack and not go into sugar shock. However, if sugar shock is your thing you can definitely pour more maple syrup overtop.
I’m not your pancake boss.

Coconut Tres Leches Pancakes
gluten-free, dairy free // yields 6-8, 5-inch pancakes
inspired by: coconut tres leches cupcakesadapted from: cinnamon roll pancakes
for the pancakes:
- 1/2 cup gluten-free oat flour
- 1/2 cup sweet rice flour
- 1/3 cup unsweetened shredded coconut, optional
- 1/4 cup almond meal
- 2 tablespoons coconut sugar, sucanat or brown sugar
- 1 teaspoon baking powder
- 1/2 teaspoon salt
- 2 large eggs
- 1/4 cup unsweetened almond milk
- 1/4 cup lite canned coconut milk
- 3 tablespoons unsweetened applesauce
- 2 tablespoons full-fat canned coconut milk
- 1 tablespoon unrefined coconut oil, melted
- 1 teaspoon pure vanilla extract
- coconut oil to grease the pan
for the tres leches topping:
- 5 tablespoons full-fat canned coconut milk
- 1 tablespoon lite canned coconut milk
- 1 tablespoon unsweetened almond milk
- 1 1/2 tablespoons pure maple syrup
- Whisk all ingredients in a bowl until combined. Let sit at room temp to thicken and whisk again before serving.
*Be sure to always thoroughly whisk/blend canned coconut milk [lite and full fat] before adding them to a recipe. They typically are quite separated in the can, especially the full-fat version.
- Mix all of the dry pancake ingredients together in a large bowl.
- Whisk the eggs until fully combined + fluffy, about 20-30 seconds, then whisk in the rest of the wet ingredients until fully combined.
- Combine the wet with the dry and whisk/stir until just combined.
- Let the batter sit for about 10 minutes without disturbing.
- Heat a griddle or large pan over medium and grease with coconut oil [or butter].
- Scoop approximately 1/4 cup scoops of batter in the pan and lightly swirl around with a spatula or spoon to about 5” wide. For thinner pancakes, add 2 tablespoons more milk to the batter and gently stir until just incorporated.
- Let cook 2-3 minutes until you see the top filled with bubbles. Flip and cook another 2-3 minutes until golden brown. Do not press down after flipping. Avoid overcrowding the pan and adjust heat as needed so the pancakes are fully cooked.
- Stack pancakes and poke with a wooden skewer or toothpick and pour desired amount of tres leches topping overtop. Let soak in for a minute then serve. Top with extra maple syrup if desired and unsweetened shredded coconut.
Tips:
- To keep the pancakes warm while others are cooking place on a baking sheet in a single layer with the oven preheated to 200* F.
- If you absolutely hate coconut, leave out the shredded coconut and sub heavy whipping cream instead of full-fat coconut milk, half & half for the lite canned coconut milk, and 2% milk for the almond milk.
And now for the mysterious cake I mentioned earlier.
So here’s the deal. This batter can be poured in an 8-inch cake pan and turned into CAKE.
PANCAKE CAKE. Cake that tastes like pancakes!
You don’t have to change 1 single thing with the recipe. And the best part is that this cake has only 2 tablespoons of sugar, making it the most suitable breakfast cake to ever live. The cake alone tastes just barely sweet [like pancakes without syrup], but once you pour the tres leches mixture overtop it adds the perfect finishing touch. You get a hint of maple syrup + natural sweetness and rich flavor from the coconut milks.
Tres Leches Pancake-Cake gluten-free, dairy free // yields 1, 8-inch round cake
- Preheat oven to 350* F.
- Thoroughly grease an 8-inch round cake pan [or use a cupcake pan with liners].
- Mix batter as directed for pancakes.
- Pour batter into the pan and bake for 24-28 minutes until light golden brown and toothpick comes out clean.
- Let cool, loosen the edges with a knife, and carefully turn out onto a plate.
- Poke holes over the top of the cake and pour the tres leches mixture overtop.
- Let soak in for 10 minutes then serve. Add more maple syrup if desired.
*Serve with coconut whipped cream on the side for an extra special treat! If you want to serve this warm, heat on a baking sheet in the oven at 200* F until warm to the touch. Be careful not to leave it in too long. Then proceed with steps 6 + 7.

The cake would be fantastic if you’re making breakfast or brunch for a crowd. You won’t have to stand at the stove flipping pancakes but everyone can still get that pancakey-comfort!
Happy weekend!
Ashley
Other recipes pancake-cake would work with: cinnamon roll pancakes, red velvet pancakes, pumpkin spice pancakes
![No-Bake Walnut "Cookie" Bars with Homemade Chocolate [2 ways!] // edible perspective](https://images.squarespace-cdn.com/content/v1/546ab118e4b020f024f62077/1425342899111-OFZDWJKKARQZI5JOXPLT/Windows-Live-Writer-2f50ee1a7f38_E303-)
![No-Bake Walnut "Cookie" Bars with Homemade Chocolate [2 ways!] // edible perspective](https://images.squarespace-cdn.com/content/v1/546ab118e4b020f024f62077/1425342899414-NK1OW0LUOCKVLT025WFR/Windows-Live-Writer-2f50ee1a7f38_E303-)
![No-Bake Walnut "Cookie" Bars with Homemade Chocolate [2 ways!] // edible perspective](https://images.squarespace-cdn.com/content/v1/546ab118e4b020f024f62077/1425342899611-GBBKXA3YT2FB6OAW3VU6/Windows-Live-Writer-2f50ee1a7f38_E303-)
![No-Bake Walnut "Cookie" Bars with Homemade Chocolate [2 ways!] // edible perspective](https://images.squarespace-cdn.com/content/v1/546ab118e4b020f024f62077/1425342899812-1TD1Q20L4NDU3O1ZDBQU/Windows-Live-Writer-2f50ee1a7f38_E303-)
![No-Bake Walnut "Cookie" Bars with Homemade Chocolate [2 ways!] // edible perspective](https://images.squarespace-cdn.com/content/v1/546ab118e4b020f024f62077/1425342900047-1H23R719K6HL9V93N3D1/Windows-Live-Writer-2f50ee1a7f38_E303-)


