loaded vegetarian lentil sloppy joes

I made this recipe on a whim last week and decided it was way too tasty not to share.  The only problem was that it finished cooking around 8:30pm and there was obviously no light left to take photos. Yes, we eat dinner late.

IMG_1209.jpg

I perused a few standard sloppy joe recipes and a recipe I made awhile back for slow cooker sloppy joes [this version is so much better!] before getting started.  I didn't really write anything down as I cooked but just tasted and added along the way.  Once I finally deemed it done I was kicking myself in the rear for not taking notes.

The next day I wrote down approximate amounts and ingredients knowing that I absolutely had to make it again.

IMG_1223-2.jpg

I waited to give it another go until I was at home and could cook up a double batch for my last family dinner.  Thankfully, I think I remembered my creation from that night almost exactly, which is surprising given my awful memory.  And with this version I added a few toppings that sent this sandwich from super tasty to freaking delicious.

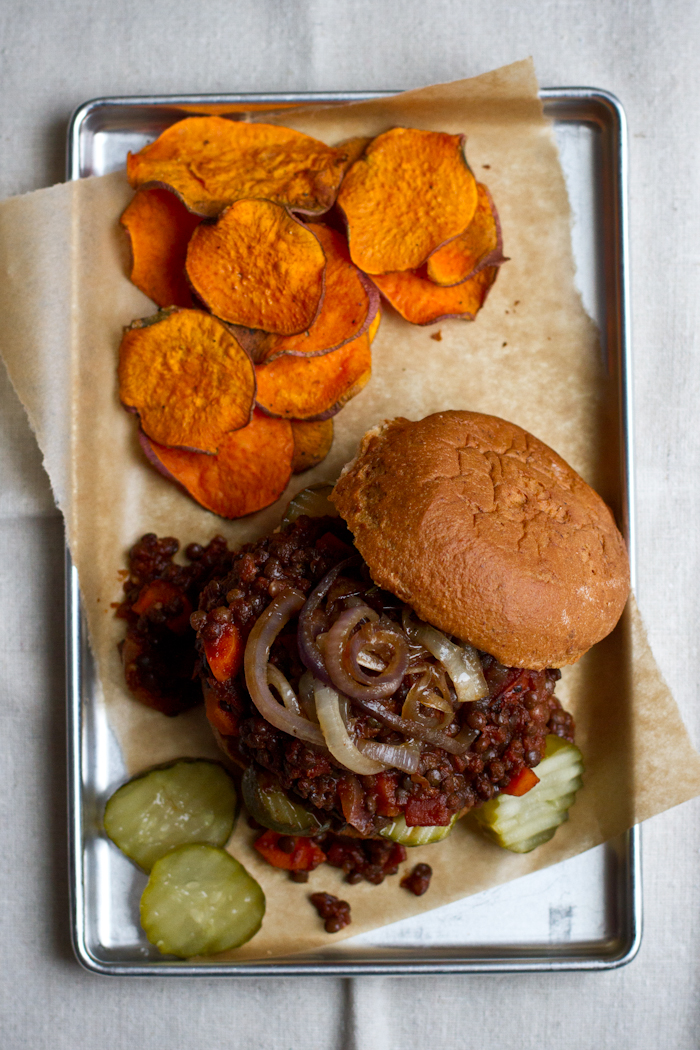
The topping ideas came from a local restaurant we head to a few times a month called, Hops & Pie.  They specialize in pizza but have quite the variety on their menu including numerous GF and vegan options.  They have house-smoked tofu, vegan cheese options, GF pizza, vegan mac n' cheese, GF quinoa pasta, and more.  My very favorite menu item is the Vegan Sloppy Jane, served on the best gluten-free bun I've ever had--which reminds me I need to ask them the brand!  They use tempeh in their version and add a nice pile of house-made pickles underneath everything.  Never would have thought to try that combo!  And the caramelized onions seal the deal.

IMG_1248-2.jpg

I had to get creative while taking photos at home since I was without my stack of 20 random plates to choose from.  I wanted something fairly plain and contrasting in color.  My parents' plates are pretty busy, so I searched the cupboards high + low.  

And then...jackpot!  A mini pan from their toaster oven.  It was the perfect "plate" to house this gigantic, sprawling meal.

IMG_1263-3.jpg

Print this!

Loaded Vegetarian Lentil Sloppy Joes

gluten-free, vegan // yields 6-8 servings

  • 1 cup uncooked black lentils
  • 1 tablespoon olive oil, or ghee
  • 1/2 cup chopped red onion
  • 3/4 cup chopped yellow onion
  • 1 med-large chopped carrot
  • 2 teaspoons minced garlic
  • 3 tablespoons mild chili powder
  • 1/2 teaspoon cumin
  • 1/2 teaspoon smoked paprika
  • 1, 15oz can fire roasted crushed tomatoes
  • 1/4 cup tomato paste
  • 2 tablespoons apple cider vinegar
  • 1-1 1/2 tablespoons pure maple syrup
  • 1/2-1 cup low/no sodium vegetable broth
  • salt/pepper, to taste
  • pickles and caramelized onions, to top
  1. Pick over dried lentils for debris then rinse well and place in a pot with cold water and bring to a low boil.
  2. Reduce heat to simmer with a lid cracked for 18-25 minutes until lentils are al dente [tender with a slight bite].  These cooking instructions are for small black lentils (solid black and shiny).  Not all lentils cook this quickly.
  3. Drain and rinse with cold water.
  4. While lentils are cooking heat oil in a large pot over medium heat.
  5. Once hot add the onions, sprinkle with salt, and cook stirring frequently until translucent and tender, about 6-8 minutes.
  6. Add the carrot and let cook another 2-3 minutes
  7. Add the garlic, chili powder, cumin, smoked paprika, and a few good grinds of black pepper and stir for 30 seconds to 1 minute until fragrant.
  8. Slowly pour in the tomatoes and tomato paste and stir to combine.
  9. Stir in the apple cider vinegar, maple syrup, and 1/2 cup vegetable broth then bring to a simmer.  Add more broth to thin out.
  10. Stir in 3 cups of cooked lentils and simmer for 15-25 minutes until thickened and the flavor is to your liking.  Add more salt + pepper as needed or cayenne for some heat.
  11. Place pickles on the bottom of a hamburger bun, then scoop the sloppy joe mixture on top, and then top with caramelized onions and the top bun.
  12. Eat with a fork + knife.  This gets messy!

to caramelize onions:

  1. Thinly slice a large yellow or red onion and then heat 1 tablespoon of coconut oil or ghee a large pan over medium heat.
  2. Add the onion stirring frequently until just softened, 5-7 minutes.
  3. Generously sprinkle with salt, stir, then reduce heat to med-low for about 25+ minutes until fully golden brown and caramelized.  Stir every few minutes.

to freeze:

  • Let cool to room temp then place 1-2 servings in a freezer bag and squeeze excess air out.  Flatten with your hand on the counter and place flat in the freezer, stacking if you have multiple bags. Let thaw in the fridge the day before you want to eat or for a few hours on the counter.  Reheat in a pot on the stove until hot.

notes/substitutions: Feel free to use 3 cups of pre-cooked black lentils instead of boiling your own.

IMG_1298-3.jpg

Pretty easy to whip up.  A filling + comforting crowd pleaser.  A cinch to double.  Killer leftovers.  Easy to freeze.  And it tastes pretty great, too.

Do I need to convince you further?

Ashley

butternut squash + black bean enchiladas

Tell me if this happens to you.

You buy a 5lb squash.  Butternut, spaghetti, acorn, sugar pumpkin…etc.

Maybe it was on sale, maybe you plan on roasting it, or maybe even making a delicious fall soup.

And then.

And then it sits on your counter for 1 solid month.  Just hanging out, being its squashy-self.  Even if your recipe is picked out it still sits.  Why is this?

Is it because squashes are pretty much the only vegetable that can sit on your counter for weeks on end without rotting?  Do you glance over like, “Hey squash, I’ll get to you next week.  No hard feelings.”  Are you fearfully anticipating the dreaded peeling, chopping, and seeding, while trying to keep all of your fingers on your hand?

Please tell me I’m not the only one.

And then you finally tackle the squash because, “you’re going to rot one day!” [Promise I don’t talk to vegetables in my kitchen.]

You start peeling or slicing, depending on the variety of squash.  You’re done in like 5 minutes because you have a vegetable peeler so sharp it could carve wood.

That wasn’t so bad.

It’s always more than worth the effort.

Especially for black bean and butternut squash enchiladas.  My favorite meal so far this fall.

While this meal may look a bit involved [okay, it is] you can finish most everything up while the butternut squash is roasting.

The toppings are up to you.  You can make or buy your enchilada sauce.  You can top these with cheese, a zesty cashew cream sauce, sour cream, avocado, or nothing at all.

I’m currently obsessed with cashew cream, so the version I made is vegan. 

Print this!

Butternut Squash and Black Bean Enchiladas

vegan, gluten free // yields 4-6 servings

Enchilada inspiration from: Daily Garnish, How Sweet It Is, Sprouted Kitchen

  • 14-18, 6” soft corn tortillas
  • 1 1/2 cups [1 can] black beans, drained + rinsed
  • 1 medium butternut squash, peeled
  • 1 medium onion, chopped
  • 2 Tablespoons vegetable broth
  • 2 Tablespoons sunflower oil
  • 1 1/2 teaspoons minced garlic
  • 1 1/2 teaspoons mild chili powder
  • 1 teaspoon cumin
  • 1/2 teaspoon oregano
  • 1/4 teaspoon coriander
  • 1/4 teaspoon salt + pepper [plus more for the squash]
  • 1/8 teaspoon cayenne pepper
  1. Preheat your oven to 400* and line a large rimmed baking sheet with parchment paper.
  2. Slice your squash lengthwise down the center and de-seed.
  3. Lay each half on its flat side then cut 1/4” slices and then into 1/4” cubes.
  4. Place on the pan and toss with 1 Tablespoon of oil and a generous sprinkling of salt and pepper.
  5. Roast for about 35 minutes, tossing once or twice while cooking.  Done when tender but not mushy.
  6. Towards the end of the squash cooking, heat a large pan over medium, and add 1 Tablespoon of oil.
  7. Add in the chopped onion and cook, stirring for 5-8min until softened.
  8. Add in the garlic, chili powder, cumin, oregano, coriander, salt, pepper, and cayenne and stir for 1 minute. 
  9. Stir in the vegetable broth, scraping the bottom of the pan to loosen everything.
  10. Add in the black beans and 3 cups cooked + cubed butternut squash. 
  11. Stir a few times until everything the beans are heated through, then remove from the heat.
  12. Preheat your oven to broil on low.
  13. Place tortillas on a baking sheet on a single layer and broil with the door cracked until they begin to dry out [a good thing, as sometimes they are a bit rubbery] and just before they start to crisp.  About 1-2min.
  14. Flip and broil the other side for another 1-2 minutes until they just start to crisp.  Note: You do not want them to fully crisp as you need to be able to roll them.  You may have to crisp them in two batches.  Just stack them on a plate as they finish.

Assembly

  1. Preheat your oven to 350* and take out a 9x13 pan and an 8x8 pan.
  2. Place about 1/2-3/4 cup of the enchilada sauce in the bottom of each pan and spread out evenly.
  3. Scoop some of the mixture into a warm tortilla, roll it up, then place seam side down in the pan.  It’s okay if a little of the filling falls out. You want the enchiladas to be touching one another.
  4. Keep rolling until you have no more filling left. 
  5. Pour enchilada sauce over top and spread, so the tortillas are smothered. 
  6. Reserve about 1 cup of the sauce.
  7. Cover with foil and bake for about 15 minutes.  All of the ingredients should still be fairly warm so it won’t take long to heat.
  8. Pour the warmed cashew cream sauce on top and serve with remaining enchilada sauce on the side.

Note: If adding cheese:  Uncover the pans, sprinkle cheese on top, and broil for a few minutes until bubbly.  If you want to make this ahead, finish all of the steps up to #5.  Cover with foil and place in the fridge.  Remove about 30 minutes before cooking.  Preheat your oven to 350* and add a bit more of the sauce as some of it will have soaked in.  If it seems to have really dried up, sprinkle about 1-2 Tablespoons of vegetable broth on top.  Cover tightly, and bake for about 25-30 minutes until the center is hot.

Butternut Squash Enchilada Sauce [adapted from Emily]

  • 2 Tablespoons extra virgin olive oil
  • 3/4 cup tomato paste [about 7-8oz]
  • 1 cup cubed + cooked butternut squash
  • 2 1/2 cups low or no sodium vegetable broth
  • 1 1/2 teaspoon chipotle adobo sauce
  • 1/2 teaspoon garlic powder granules
  • 1/2 teaspoon cumin
  • 1/2-1 teaspoon salt
  • 1/2 teaspoon black pepper
  • 1/4-1/2 teaspoon cinnamon
  1. In a large pot heat the oil over medium.
  2. Once hot, add in the garlic, cumin, 1/2tsp salt, pepper, and 1/4tsp cinnamon and stir for 30 seconds.
  3. Add the tomato paste, vegetable broth, and adobo sauce and whisk until fully incorporated.
  4. Add in the squash and blend with an immersion blender or in a blender.  If using a blender you may need to do this in 2 batches.  Use caution as the sauce will be very hot.
  5. Return to med-low/low and let simmer for 10 minutes.
  6. Taste and adjust seasoning if necessary.  I used 1/4 + 1/8 teaspoon cinnamon and the salt will vary depending on the sodium content of your vegetable broth.
  7. Remove from heat.  It will thicken a bit as it sits.

Note: Chipotle adobo sauce can be found in the ethnic food aisle in a small can.  It is hot!  Adding 1 1/2 teaspoons adds a medium heat level to the dish. 

Cashew Cream Sauce

  • 1/2 cup cashew cream
  • 1 Tablespoon nutritional yeast
  • 3 Tablespoons - 1/3 cup vegetable broth
  • 1 1/2 teaspoons chipotle adobo sauce
  • 1/2 teaspoon mild chili powder
  • 1/4 teaspoon cumin
  • 1/4 teaspoon garlic powder granules
  • 1/4-1/2 teaspoon salt
  • 1/4 teaspoon black pepper
  1. Place all ingredients in a blender and blend until smooth, starting with 3 Tablespoons of vegetable broth and adding more as needed to thin out.  You’re looking for a very pourable but thick sauce, not watery.
  2. Heat in a pot over low heat until warm and pour over the enchiladas.

Note: If you have a non-squash eater in your family not to worry. Grab a russet or Yukon gold potato and cube it up at the same time you cube the squash. Place it on a different pan with oil, salt, and pepper, and roast it along with the squash. Add 1.5 cups of that potato to half of the black bean mixture and 1.5 cups of squash to the other half of the mixture.  Easy solution!

The corn tortillas soak in the sauce and become almost doughy.

The cashew cream sauce is as good as frosting on a cake.

And the leftovers are a plenty.

Hope you have a great weekend!

Ashley