Food Photography Tip of the Week |13|

Food Photography Tip of the Week |13|

Your clothing + surroundings cast colors onto your food!

This is a simple tip to think about whenever you’re photographing food. I encounter clothing color issues numerous times per week because when I first wake up in the morning I’m not thinking about the color of my shirt. Also, I typically wear workout clothes throughout the day and the tops tend to be pretty vibrant.

The colors from your clothes basically bounce right onto your subject because you’re standing so close. Just like when you use a white board to bounce light or a black board to enhance shadows. If you’ve ever noticed your photos having a strange tint when you go to edit them it could have been due to what you were wearing. And while it is possible to color correct in Lightroom + Photoshop, it’s difficult—and sometimes impossible—to fully fix the photos.

However, it’s not only clothing that can affect the color temperature of your photos but your surroundings as well and sometimes even props. If you’re shooting close to or on the floor and you have yellow-orange color hardwood floors they will definitely throw color onto your subject. What about the color of your walls? Remember how in my kitchen the bottom half of the walls are a clay-orange color? Well, if I don’t have my photo table higher than that orange part of the wall my photos will 100% of the time have an orange hue. It’s amplified even more if I used a wood surface to shoot on since the wood has natural warm tones to it.

Example time.

Food Photography Tip of the Week -- clothing casts color | edibleperspective.com

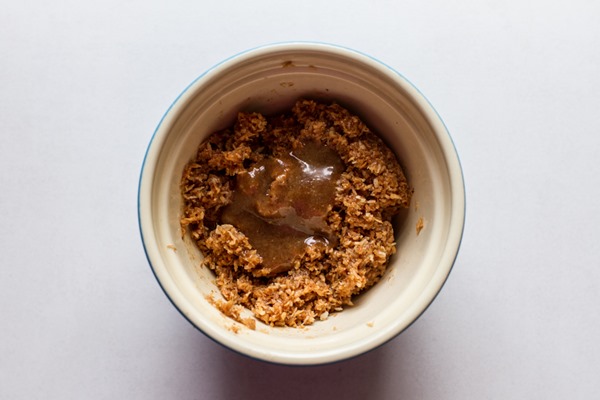
Above: I was wearing a hot pink tank top that added a pink/purple hue to the white surface. It also added more orange/red saturation to the coconut and caramel.

Below: In this photo I was wearing a grey tank top which eliminated the oversaturation of the coconut and helped keep the background whiter.

Food Photography Tip of the Week -- clothing casts color | edibleperspective.com

Food Photography Tip of the Week -- clothing casts color | edibleperspective.com

Above: I was wearing the same pink tank top in the photo above which you can really tell by the white surface and the first 2 doughnuts.

Below: With a gray top the colors were much more natural. Scroll down and then back up to compare these two photos.

Food Photography Tip of the Week -- clothing casts color | edibleperspective.com

Food Photography Tip of the Week -- clothing casts color | edibleperspective.com

Above: In the photo above I was wearing a bright pink and slightly shiny workout top. It threw even more color than the matte pink tank top I was wearing in the previous photos. Check out my reflection in the spoon!! The tea towel is also glowing quite a bit and the pasta also has more of an orange tone to it.

Below: In the photo below I was wearing the same top but stood a bit further away when I clicked the shutter to take the photo. It’s not as bad but you can still see my reflection in the spoon and a bit of pink on the towel.

Food Photography Tip of the Week -- clothing casts color | edibleperspective.com

Below: In the photo below I draped a white kitchen towel over my shirt, which is my go-to fix when I don’t want to change what I’m wearing. My pants/shorts are usually pretty neutral, so I typically just need to cover my top. Check out the spoon, napkin, and pasta color and scroll to the two photos above. It’s a huge difference!

Food Photography Tip of the Week -- clothing casts color | edibleperspective.com

This tip may seem simple and obvious but it’s something I didn’t think about until I realized our orange walls were affecting the way my photos looked. Have you ever encountered this issue before? While you still may have to do some color correction when you go to edit, this tip will definitely help make that process easier.

Don’t forget!! It’s Doughnut Week!! And this week only you can find my book, Baked Doughnuts For Everyone 35% off on my publishers website. Just use the promo code below when you order! As always, thank you so very much for your support!!

Promo Code: doughnut35 – enter this in the “promotion/coupon code” field after clicking “add to cart”

More doughnuts coming soon!

Ashley

Food Photography Tip of the Week |12|

Food Photography Tip of the Week |12|

My photography station setup.

I thought we’d take a break this week from a lengthier lesson and check out the area where I take my photos. Last week a reader asked about my photography setup, so here it is!

What should be our breakfast nook is actually my photography station. Since I take photos nearly every day I needed a space where I could keep my photo things out all of the time. Our house is fairly small so the options were limited and we don’t have enough storage space to keep it all out of sight. I also didn’t want to keep everything out in the dining room or living room and the light in those rooms wouldn’t have worked anyway. Luckily, the kitchen gets a lot of light and has enough room for my setup.

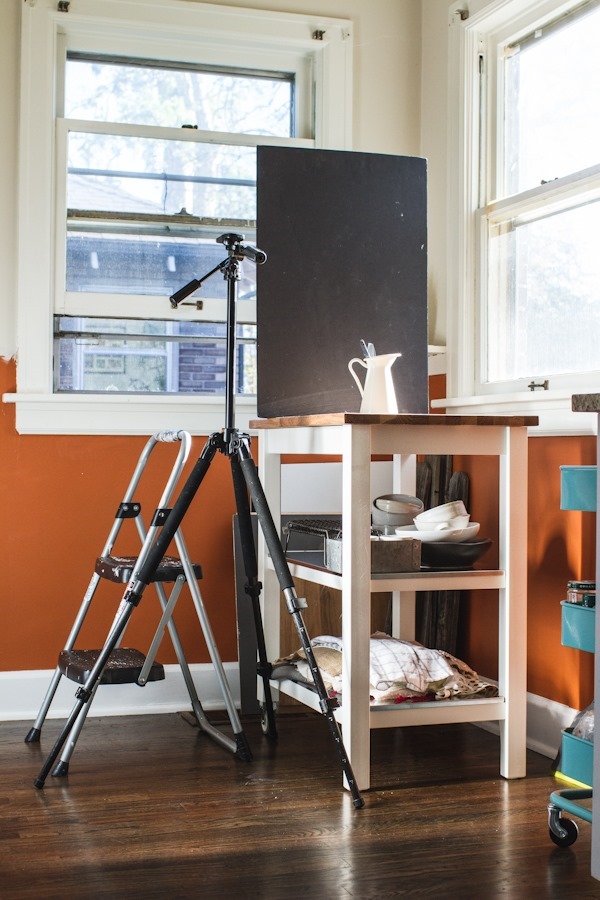
My station has progressed from shooting on a stack of boxes when we first moved in, to shooting on a very small + unsteady table, to a large folding table with adjustable height, to the kitchen cart you see below. 

The folding table [$36 from Costco] was something I knew we would get a lot of general use out of and I could also use it for my photo table before deciding on a more permanent solution. The table was great because it had 3 adjustable heights which is necessary since my windows are pretty high. I find that if the surface I shoot on is more than a few inches below the window my photos don’t get enough light. However, the table was a major eye sore and took up too much space [it’s really long].

Please ignore the step stool, which is also a huge eye sore.

Also ignore the wavy line where the orange + cream paint meet. We still have to install a strip of wood there.

Food Photography Tip of the Week - 12 | edibleperspective.com

I’ve been searching around for kitchen carts and finally decided on this one from Ikea. I wanted something sturdy but also with wheels since I need to maneuver it in the space depending on the light and where I want to shoot. I also wanted it to have shelves below to store props and linens. I was hoping for something that matched our white kitchen cabinets and didn’t look too out of place. This was definitely the best option and the top surface is butcher block which I can also use to shoot on. Win, win!

The cart fits in the space much better and makes our kitchen feel a lot bigger. Plus, it’s much more pleasing to look at in comparison to the plastic folding table.

The windows are east + north facing, so the light pours in in the morning which you can see below. I took these at 7:30am but usually wait a few hours before I start shooting food so the light is a bit softer. I actually have a pretty hard time with the light in my kitchen. It’s hard to shoot up so high [for overhead shots] and having the two windows can be tricky to work with. Low windows or sliding glass doors would be extremely helpful.

This is one of my typical setups with the black matte board to the left which blocks some of the north light and creates richer shadows in the photo. I take most of my photos from the side of the cart where the tripod and step stool are, but I do move around to other sides for different lighting effects and angles.

Food Photography Tip of the Week - 12 | edibleperspective.com

I also have this rolling cart from Ikea which holds onions, potatoes, spices and other kitchen staples on the bottom shelves but on the top shelf I stash some of my most used photo items.

I will admit I cleaned the cart for this photo.

Food Photography Tip of the Week - 12 | edibleperspective.com

  • cookbook stand – incredibly handy
  • fancy napkins
  • straws
  • paper towels for spills
  • camera battery charger
  • q-tips for drips
  • tweezers
  • mini spoons + most used silverware

Food Photography Tip of the Week - 12 | edibleperspective.com

This is the position I’m usually in when taking photos, especially for my overhead shots. If I’m using the black [or white] matte board it’s typically leaning against a jar like you see below.

I take almost all of my photos with a tripod except for my overhead shots. Since my shooting surface is at counter height my tripod does not extend high enough to get those shots.

Food Photography Tip of the Week - 12 | edibleperspective.com

And to the left I keep some of my shooting surfaces which also double as backdrops.

Food Photography Tip of the Week - 12 | edibleperspective.com

So that’s about it for my general photography setup. I feel like it’s a pretty simple setup and I’m loving the space so much more now that I’m using the smaller cart. Let me know if you have any questions!

Hope you all enjoyed the long weekend!

Ashley