Food Photography Tip of the Week |9|

Food Photography Tip of the Week |9|

How to take sharp photos – part 2

Last week we talked about changing your aperture settings to increase photo sharpness and it seemed you were all very interested in hearing more. So today we’re going to look at how shutter speed affects the sharpness of your photos.

Measured in seconds, shutter speed refers to the the amount of time the shutter remains open after pressing the shutter button. During this time your camera collects light and records the photographic data to create the image.

Quick exercise:

  •  
    • If you’re a visual person you can do a quick exercise with your hand to understand this concept better. Touch your thumb and index finger together to create a circle. Line up your other fingers evenly with your index finger. Close your hand over the duration of 3 seconds to make a fist. Now do it again but close your hand as fast as you can. So now if you can imagine all of the light that is allowed to come into your hand during those 3 seconds, and then how little the amount of light that can come in when you closed it quickly. This is just like your camera!

So while a slower shutter allows more light in [making for a brighter photo], which is very helpful in low-light conditions, it also means that ANY movement the camera feels while the photo is being taken will come through in your photo. This is when you have the potential to see blur.

When your shutter closes quickly there is less chance for “camera shake” resulting in sharper photos.

I encourage you to experiment to find the minimum shutter speed that will still allow you to have sharp photos. If you have super steady hands you may be able to have your shutter at 1/30 without seeing any blur/camera shake in your photos. But if you have slightly shaky hands [like me!] you may need to keep your shutter at 1/100+ for the best results. [Sometimes I do go below 1/100 when hand-holding, but I take more shots until I get one that is fully in focus.]

But this also depends on the lens you’re using. A lot of people say the rule of thumb is to not set the shutter speed below the frame size of your lens [the “mm” number]. So if you’re using a 50mm lens you want to keep your shutter at 1/50 or faster. Just remember this is a general rule. I found that with the 50mm my photos were best with the shutter at 1/100 or faster when shooting food.

NOTE 1:

  • The shutter speed fraction you see displayed on your camera is time measured in seconds. If you see your camera is set to 1/50 that means 1, 50th of a second. If you see 1/160 that means 1, 160th of a second – which is a great speed for general hand holding shots that will ensure you crisp photos nearly every time.

NOTE 2:

  • If you’re trying to work action into your photos [like pour shots] you’ll really want to crank the shutter speed as high as you can. You’re literally trying to FREEZE motion, so you want the shutter to close quickly to capture it.

NOTE 3:

  • If you’re shooting in manual you’ll notice that as you increase the shutter speed [faster] your photo’s exposure will decrease [darken]. So you’ll have to balance with possibly lowering your aperture or increasing your ISO to compensate. It’s all about balance to get the proper exposure and look you want.

NOTE 4:

  • I am a huge proponent of tripods for this very reason. If you are working with low-light conditions especially, I highly recommend using one. They can really be helpful in any type of lighting environment, though. When your camera is fixed on a tripod that means you are going to avoid the camera shake we talked about earlier. This allows you much more flexibility in creating crisp photos because: when you can slow your shutter speed down to allow more light in you don’t have to rely on ISO, so you can also lower your ISO and you can really dial in your aperture to the exact setting you want.
    • sidenote: In the rare case that you have your camera on a tripod and have the shutter set slower than about .5 seconds [0”5 on my camera], you may find camera shake in your photo. This is because of the slight movement your camera makes when the shot is taken. At that slow of a speed, even when on a tripod, the image may record a small amount of movement.

----

Okay. That got a little wordy. Let’s move on to the photo examples.

Food Photography Tip of the Week |9| edibleperspective.com

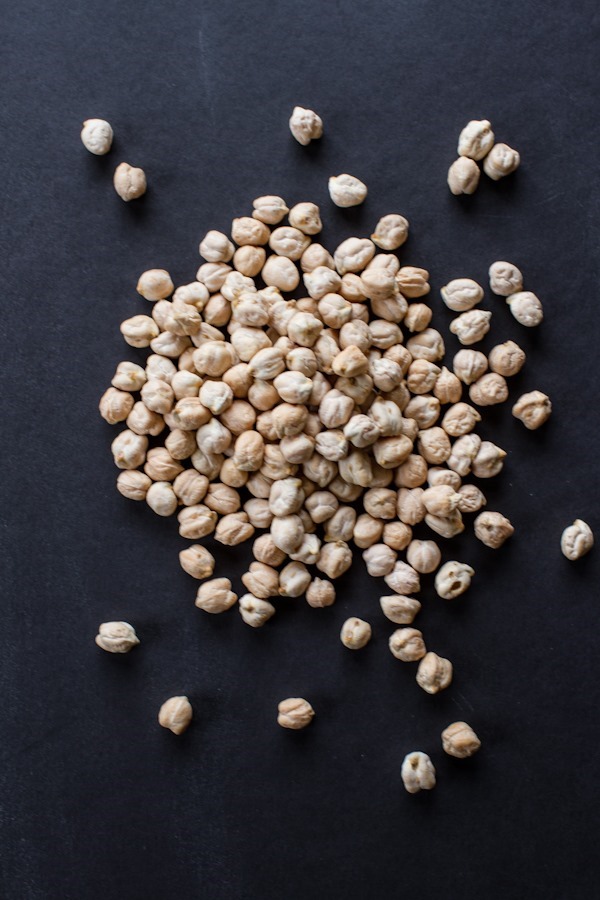
above: f/5.0 – ISO: 100 – SS: 1/30

You can definitely see the camera shake that happened in the photo above. The photo below appears fairly crisp until you compare it with the third photo.

below: f/3.2 – ISO: 100 – SS: 1/80

Food Photography Tip of the Week |9| edibleperspective.com

below: f/4.0 – ISO: 320 – SS: 1/200

At 1/200 the level of clarity is much greater. These were all taken by hand-holding the camera.

Food Photography Tip of the Week |9| edibleperspective.com

Now let’s take an up-close look to see just how out of focus the first 2 photos actually are. [In the same order as above.]

below: SS 1/30 – 1, 30th of a second

Food Photography Tip of the Week |9| edibleperspective.com

below: SS 1/80 – 1, 80th of a second

Food Photography Tip of the Week |9| edibleperspective.com

below: SS 1/200 – 1, 200th of a second

Really look at the above and below images. Scroll back and forth a few times and see how much more detail there is in the lines + ripples on the chickpeas.

In order to achieve the shutter speed of 1/200 I had to increase my ISO from 100 to 320.

Food Photography Tip of the Week |9| edibleperspective.com

Food Photography Tip of the Week |9| edibleperspective.com

above: f/5.0 – ISO: 125 – SS: 1/30

For this next photo set I changed up the angle. You can definitely tell that the photo above is not fully in focus. The focal point is just about at the centerline of the photo.

Compare the detail above and below and note that I changed my shutter speed to 1/160 and also increased my ISO to 640 to allow for a properly exposed photo. It’s all a give + take!

below: f/5.0 – ISO: 640 – SS: 1/160

Food Photography Tip of the Week |9| edibleperspective.com

The photo below was taken at the 1/30 speed but WITH a tripod. Using a tripod allowed me to keep the ISO on the lowest setting of 100, which also allows for a crisper image.

WITH TRIPOD

below: f/5.0 – ISO: 100 – SS: 1/25

Food Photography Tip of the Week |9| edibleperspective.com

And now we go in a bit closer. [Photos are in the same order as above.]

below: SS 1/30

Food Photography Tip of the Week |9| edibleperspective.com

below: SS 1/160

Food Photography Tip of the Week |9| edibleperspective.com

You’ll notice the clarity of the photos above and below are nearly identical. However, you’ll also notice that the above photo has some noise [graininess] in it. This is because the ISO was increased to 640. You’re not going to notice this unless you’re super zoomed in, but it’s good to be aware of what happens when you increase your ISO. If you increase it too much, you’ll start to see noise without zooming in. The threshold for ISO-noise varies greatly with every camera.

below: SS 1/30 WITH TRIPOD

Food Photography Tip of the Week |9| edibleperspective.com

If you are feeling totally confused right now do not worry! Read this a few times, play with your camera, look at the settings when you’re editing your photos, zoom in to check the sharpness, and soon it will all start to make sense. Promise!

What do you usually try and keep your shutter speed at? Have you ever tried using a tripod?

Ashley

Food Photography Tip of the Week |8|

Food Photography Tip of the Week |8|

How to take sharp photos.

I receive frequent questions and hear many people—including myself—talk about their photos not being as sharp as they’d like. So, I figured I would try and get to the bottom of why this may be.

The answer: Unfortunately, there is no easy solution. There are at least 5 different reasons your photos are not as sharp as you’d like. But, the good news? I’m here to break down the probable causes and fixes in a few different posts. I wanted to break down each in a separate post to keep things as simple as possible. And this way you can try one idea at a time.

Solution #1: Increase your depth of field.

Depth of Field – portion of your photo that is in focus

Remember:

  • the lower the aperture [f-stop] numbers –> the wider the lens opening –> the shallower the depth of field [less in focus]
  • the higher the aperture [f-stop] numbers –> the narrower the lens opening –> the deeper the depth of field [more in focus]

So why would increasing your depth of field make your photos sharper? There are 2 main reasons.

  1. More of your photo is in focus. Simple as that.
    • I know you probably want that creamy, soft, blurred [bokeh] background and think that your aperture needs to be at 2.8 or lower to achieve it. However, when you set your aperture this low and stand 18-inches away from your subject, you would be surprised to know that [with a 50mm lens] only .33-inch of your photo is in focus. And actually, it’s .16-inch in front of and behind the actual spot you’ve focused on. And if you’re standing closer than 18-inches to your subject even less of the image will be in focus. Check out a depth of field calculator to see what I mean.
  2. Lenses often have a sweet spot for sharpness.
    • Usually this sweet spot is quite large, but it’s typical that the smallest and largest f-stop numbers won’t be as crisp as if you step it up or down a few notches. When the lens is pushed to its limits the quality of the photo slightly degrades. If you’re using a 50mm 1.8 or 1.4 [fairly common food lenses] try setting your aperture above f/2.8 and see if your photos look sharper.

Side note: Watch your minimum focus distance.

  1.  
    • Minimum focus distance is the shortest distance between your lens and your subject that your lens can focus on. It varies with every lens. You may notice sometimes that your camera is not allowing you to take a shot but if you back up just an inch the shutter activates. This is because your lens is too close to your subject and it cannot focus. Similar to pushing the limits of your aperture settings, if your lens is right at the limits of the minimum focus distance the quality of the photo is slightly degraded. Try backing up just a step or two and see if that produces a sharper image. Taking a step back will also slightly increase your depth of field. [If doing this widens the frame of your photo more than you would like you can always crop the image in post-processing.]

I encountered this problem with my Canon 50mm 1.4 all of the time and rarely set it lower than f/2.8. The image was just never as sharp as I wanted. Part of this is the quality of the lens but part is also due to what you just read above.

Let’s look at a few examples.

[I’m currently using the Canon 35mm 1.4L on my Canon 7d camera – The lens is a very new addition that I am absolutely loving.]

Food Photography Tip of the Week 8 | edibleperspective.com #foodphotography #foodphototips

above: f/2.0 – ISO: 200 – SS: 1/200

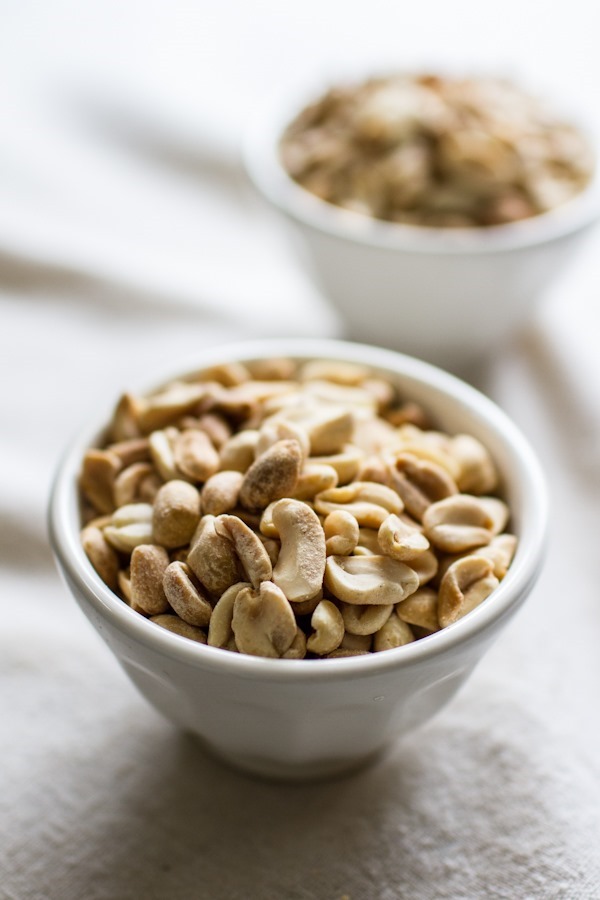
With the above and below images you’ll notice I focused on the center peanut that has a vertical positioning. While the center peanut does show sharpness and detail in that above image you’ll notice that the very top edge is slightly soft. This is because my depth of field was set to be very shallow and hardly any of the image is actually in focus.

Step up the aperture to f/4 [below image] and you’ll notice the entire center peanut is fully in focus and the detail is much sharper while still allowing a soft and creamy blurred background.

Take a look at the back bowl of peanuts and compare the two as well. In the bottom image the peanuts still take shape and you can tell what they are without really drawing your eye to them. But in the above image they’re so blurred that they are unrecognizable.

below: f/4.0 – ISO: 200 – SS: 1/80

Food Photography Tip of the Week 8 | edibleperspective.com #foodphotography #foodphototips

below: f/6.3 – ISO: 400 – SS: 1/50

With an aperture at f/6.3 the depth of field widens even more, creating greater detail in the image.

Food Photography Tip of the Week 8 | edibleperspective.com #foodphotography #foodphototips

Food Photography Tip of the Week 8 | edibleperspective.com #foodphotography #foodphototips

above: f/2.0 – ISO: 200 – SS: 1/160

With the next two images we’re comparing the f-stop settings at f/2 and f/4. Notice the difference in sharpness of the second bowl and of the fabric in each image. You’ll see that by increasing your depth of field just slightly your image will appear much sharper. There’s a bit more texture in the fabric with the image below but it still holds a soft feel around the outer edge of the bowl and below.

If the look you’re trying to achieve is best at f/2, then by all means go ahead with that setting. This is just something to experiment with!

below: f/4.0 – ISO: 200 – SS: 1/50

Food Photography Tip of the Week 8 | edibleperspective.com #foodphotography #foodphototips

Food Photography Tip of the Week 8 | edibleperspective.com #foodphotography #foodphototips

above: f/2.0 – ISO: 200 – SS: 1/160

In the above image the peanuts lose their sharp edge pretty quickly. It’s almost hard to even tell which peanut was focused on. But in the image below there is a lot more detail and a sharper edge.

below: f/4.0 – ISO: 200 – SS: 1/50

Food Photography Tip of the Week 8 | edibleperspective.com #foodphotography #foodphototips

Do you ever experience photos that aren’t as sharp as you’d like? Do you think this may be a possible solution for you? If not, more ideas will be coming soon!

Ashley